Custom 8 Foot Barn Door

The barn renovation continues with custom shelving, vanities, railing, and of course lots of sliding barn doors. And what is even better you ask?  We were able to use the 250 year old beams from that were salvaged from the existing barn. This was also a great excuse to upgrade our shop's band saw!! We will really use any excuse to upgrade our tools! Right? 

So we hauled these massive beams to our shop and used our new band saw to rip them down into usable lumber! This process was a breeze with this new saw. 


Look at that beautiful wood!

Look at that beautiful wood!

Then the building began! 

salvaged barn wood for barn wood door building.jpeg

Once the barn door was finished, we hauled it over the the barn project to install!  The hardware was custom order this time. We usually make our own, but this project called for some heavy duty hardware. 

salvaged barn beams for large rolling barn door sping oak.jpeg

This one-of-a-kind sliding barn door finished off the large barn perfectly!

Finished barn renovation near Phoenixville

Flea or Flip on a Budget

When beginning our search for a house to renovate, my most gross recollection is when we began touring a house and all of sudden began feeling bugs on us. We all ran screaming into the street. It turns out we were covered in fleas!!!!!!! So disgusting.... and I am sure we provided some entertainment to the neighbors that were staring at us...I don't know how we continued after that experience, but we did. We recently renovated a home in Pottstown, PA. It was an adorable single family home with a lot of potential. We definitely know what potential is now after touring many foreclosures and homes that desperately needed love. We were on the prowl for a house that need to be restored to a family home again!

"Some people look for a beautiful place, others make a place beautiful!" Hazrat Inavat Khan

This home was completely gutted when we found it; therefore we were able to design what we wanted. However, we were on a tight budget. So everything you see in the picture was added. We also staged the home to make it warm and inviting to those that would make it there future home. I just love how it turned out. 

kitchen renovation on a budget

The kitchen cart was built by David to add some extra working space in the kitchen. It also adds some storage for pots and pans.... I also love the industrial pipe shelving added above the microwave. 

We added some pendant lights and a dining room light to make the room bright. We added a rustic wood flooring. The dining room space opens to the kitchen which is great for entertaining. I can just picture a family cooking and sharing a meal together. 

dining room renovation

The house was a 3 bedroom home with great space in each. We wanted to make the master bedroom a sanctuary of sorts to rest and retreat. David built this custom bed and built in a beam with exposed bulb lighting for great atmosphere. 

Master bedroom renovation with rustic beams

We also completely redid the bathroom with a porcelain tile that looks like handscraped hard wood from Lowes. We added a new vanity, mirrors and lighting. 

So that is a wrap! I could definitely live here, and the renovations were done on a budget! What do you think of the finished product? Until the next home renovation you will see us cautiously entering homes like this....

renovation house hunting

I guess I am the only one afraid of fleas...

120 Year Old Church Sanctuary Renovation in West Chester

What an amazing project we were able to take part in!!! This church needed a facelift and we were more than happy to give it one. This beautiful, historic building is 120 years old and has so much character. As we were designing the new space we wanted to incorporate some of the amazing existing arches already in the doors and windows. The church has characteristics symbolizing some gothic elements. "A Knight's Tale" anyone? Well we definitely don't want javelin contests, but the other elements we wanted to implement in the design. 

Here is the entry door to the building: 

Stone church with arched entry door in West Chester

We are already thinking about a giant door knocker... Or maybe that is just me.  Anyhow, here are some before pictures of the space we were working with and the design we created for the space.

church renovation design in West Chester

We planned to take up the existing green carpet and refinish the original flooring in a dark Jacobean stain. We planned to incorporate the church's new logo with a custom crafted wall piece. We planned to build the stage in the front, put the flooring on it, and finish out the front  in a chevron. The coolest part of the renovation is the custom, hand-crafted arches that David built. 

We began by taking out everything that needed to go. We started to frame out the stage first.

We began by taking out everything that needed to go. We started to frame out the stage first.

We also painted the entire hall a medium grey to go well with the dark floors and arches. 

We also painted the entire hall a medium grey to go well with the dark floors and arches. 

This pictures shows the arches being built.

This pictures shows the arches being built.

The stage was finished and just needed stain and paint, and the arches were finished as well.

The stage was finished and just needed stain and paint, and the arches were finished as well.

After we completed the stage, we began sanding the floors. This was a daunting project, and I could not feel my hands for at least a week from the constant vibration in the sander. My neck was also stuck in a downward position. We were all in the same boat after the long sanding hours we all put in. It was all worth it in the end, because the floors 

This shot captures the finished floor, stage, and arches. All the elements blend together so nicely to create a warm, inviting space with a lot of character.

This shot captures the finished floor, stage, and arches. All the elements blend together so nicely to create a warm, inviting space with a lot of character.

David handcrafted this logo for the space!

David handcrafted this logo for the space!

Finally here is the finished space for congregants to meet and enjoy! 

Finally here is the finished space for congregants to meet and enjoy! 

This was such a great project to renovate such an old building and restore the beauty and history that was in the building from the hidden spaces we found all the way to the flooring!

Kitchen Makeover

So we set out once again to transform a kitchen to fit the client's needs and dreams! We always try to make dreams happen even on a budget. Can it be done? Yes! Here is the before picture: 

Thee clients were not in love with there blue countertops! They also wanted to move to a single unite oven and use the wall space fore a built in pantry!

Thee clients were not in love with there blue countertops! They also wanted to move to a single unite oven and use the wall space fore a built in pantry!

We wanted to transform this kitchen on a budget. When thinking about refinishing cabinets we always assess the condition of the cabinets and if refinishing is possible. These cabinets were in great shape. When refinishing cabinets you do have to sand the seal off on the front and back of all the panels and base. This is the most time consuming step. Then we use a special cabinet primer paint to protect the wood from nicks and scrapes. Then we use a cabinet enamel for the final coats. They turned out beautifully.

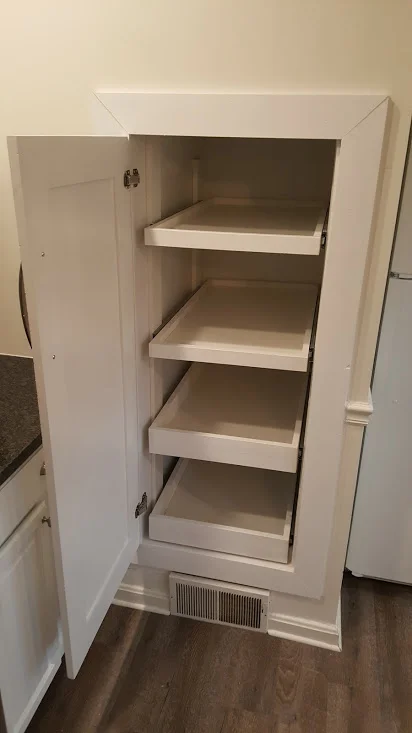
We also put in new vinyl tile flooring, a custom built pantry, and custom built cabinets to fit around the new stand alone oven. The clients ordered granite counters from Lowes. We also installed new hardware and a beautiful subway tile backsplash to finish it off. The kitchen looked brand new. The clients now had a space that was more functional and inviting for the family to gather as meals are prepared! 

Custom built-in pantry with sliding drawers where the oven used to be.

Custom built-in pantry with sliding drawers where the oven used to be.

Farmhouse sink and faucet from IKEA!

Farmhouse sink and faucet from IKEA!

Dramatic change!

Dramatic change!

The new stand alone oven needed a custom built cabinet on the outside edge perfect for cookie sheets!

The new stand alone oven needed a custom built cabinet on the outside edge perfect for cookie sheets!

Complete kitchen makeover complete!

Complete kitchen makeover complete!

We love it when a plan comes together....

Powder Bath Transformation

In the modern farmhouse renovation one of the easiest projects to tackle first seemed to be the powder bath. For starters it seemed like a small room that we could conquer easily. Little did I know this dark, dreary, rose covered space would turn out to take a little more time than I thought.

Before picture powder bathroom renovation

However, I did prevail in the end. A small bathroom will not defeat me! I already had a vision in my head of what I wanted to do to the space.

The wallpaper was the first thing to come down. Wallpaper can be tricky but with the right tools (a scraper, a scoring tool and spray) it will come off easily. Believe me I have tried everything on the 1,000,000 walls I have removed wallpaper from. Hot water by itself rarely works effectively. A steamer is often overkill unless the wallpaper has been there for over 30 years. I also wanted to add a box patterned board and batten of sorts to change it up. I found an old window that I turned to a mirror. I put in a new pedestal sink (because the prior one was cracked in the basin), and I changed the faucet and hardware.

powder bathroom farmhouse barn door cabinet shanty2chic

Lastly, I had David build a sliding barn door cabinet above the toilet for storage. It is ADORABLE! David built the piece based on Shanty2Chic plans but modified it to fit our needs. He also custom crafted the hardware and wooden wheels. I go gaga over these adorable wooden wheels. It reminds me of those old fashioned wooden toy trucks that bring you back to a simpler time....

Or maybe that is just me. Anyhow, the finished product is beautiful. I used Chelsea Grey on the walls by Benjamin Moore and a bright white on the box board and batten.  I really enjoy hiding in there at times when I need 5 minutes of silence. You know what I mean right?  Here is the finished room. What do you think? 

modern farmhouse renovation powder bathroom

Kitchen Renovation on a Budget in Phoenixville

When you are thinking of renovating your kitchen it is often overwhelming. How much will it cost? Can I afford it? Will it be worth it? Can I still get what I want? These are all questions that go through our minds when thinking of renovating. 

The first question to ask when thinking about renovating is am I going to stay in the home for a long time or do I want to sell in the next couple years? That is an important question to answer!

If you are selling: how much do I want to invest and how can I renovate my kitchen to appeal to the most number of people? Style at Home states you will get between 75 to 100% back on your kitchen renovation. This Old House explains how to not price yourself out of your market by over-renovating or spending too much on a renovations. At the end of the day you want to stick to no more than 10 to 15% of your home value on a kitchen renovation. This number will help you avoid some common pitfalls when it comes to renovating for resale. 

You can often give your kitchen a facelift which is a great option for resale. It is also a great option if you are on a tight budget but want to enjoy your home more. We did a recent kitchen renovation/facelift on a budget. It can be done! Here is the before picture of the kitchen: 

Before:

Before kitchen renovation in Phoeniville
Before kitchen facelift in Phoenixville

The kitchen needed some new life. The flooring and cabinets were outdated. The countertops where mismatched, and the walls needed repair. And that is exactly what we did! We went with a great single bowl farmhouse sink from IKEA. The butcher block countertops were also from IKEA.

After:

Farmhouse style kitchen renovation in Phoenixville
Farmhouse sink renovation in Chester County

The client wanted to paint and backsplash on their own to save some money. The main parts of the kitchen were given a major facelift and the kitchen was transformed. The final project list was refinished cabinets, new counters, sink, faucet, removed the high wall jet out, raised the cabinets, new vinyl tile flooring, and added lighting. What do you think? 

Modern farmhouse renovation, Phoenixville: Family Room Transformation

This room was the starting point on this modern farmhouse renovation. It is the gathering point in the house, and it is connected to the kitchen. I had a vision for this house and it started here. I wanted to incorporate some really cool design features with the 20 feet ceilings. I also wanted the space to feel warmer and inviting. I decided to start with the fireplace. The fireplace had so much potential but as it stood....BORING & OUTDATED! The rose curtains had to go... or better yet be burned. It appeared as though they had never been cleaned in 20 years with the amount of bugs that fell off of them and the dust that immediately sent me sneezing... So here is the before picture. 

BEFORE:

Modern Farmhouse Renovation in Phoenixville

With the fireplace I began by adding dimension and height. I also used bright white paint to begin lighting up the room. I did a custom box pattern to dress up the wall and make it a central focal point. Here are some in progress pictures. I used the primed MDF board for this. I then added crown molding trim at the top. 

Fireplace accent wall

I wanted to set the vision for house with a modern farmhouse feel. I wanted bright white with a touch of rustic. So after I finished the fireplace I began adding board and batten. We put a light gray on the walls (Stonington Gray by Benjamin Moore). 

Next I wanted to add some dimension. I had the crazy idea of building and installing beams on the 20 feet ceilings. So that is what we did... They turned out beautiful. We did custom metal accents on all of them. Then David made custom orb lights to hang down in between. We also installed a new ceiling fan. 

Finally, we built custom furniture for the room including: 4 floating shelves on the wall, a framed out TV, huge console storage table, rustic x coffee table, and rustic x end tables. We added dark walnut Levolor blinds and decorated. The space was totally transfomed into an inviting, warm space to hang out with the family.  What you think? 

AFTER: 


Modern farmhouse family room renovation in Phoenixville

Secondary Bathroom Facelift!

Sometimes secondary bathrooms get the least amount of effort and attention. However, most of the time it is the bathroom our guests use and/or our children. This bathroom needed a major overhaul and that is what Iron Space Designs set out to do. Here are the before pictures: 

modern farmhouse bathroom renovation before picture
modern farmhouse bathroom renovation

So as you can see from the pictures, there was more white tiles. White tiles are not bad at all when used in moderation. However, in a bathroom the grout is really hard to keep clean on the floor when it is bright white. Water from the shower, little pitter patter of dirty feet, etc... makes for a lethal combination with white grout. Also the faucet had a slow leak and would never shut of. It was time to renovate this space to make it stand out!

We custom built a vanity with a lower shelf, put in a farmhouse drop-in sink with a new faucet, tiled the floor with a reclaimed porcelain tile, framed out the mirror, dressed up the lighting, and put in custom pipe hardware! It completely transformed the space!

Custom built vanity and shelf, framed out mirror, and pedestal sink transformed this bathroom!

Custom built vanity and shelf, framed out mirror, and pedestal sink transformed this bathroom!

The porcelain tile with a reclaimed look added so much character to the space! The custom pipe hardware added a touch of industrial style as well.

The porcelain tile with a reclaimed look added so much character to the space! The custom pipe hardware added a touch of industrial style as well.

Modern Farmhouse Master Bathroom Renovation

What is the best thing to motivate a total bathroom renovation you ask?  For me it was when water began pouring through the ceiling of the first floor, and the culprit was the master bathroom shower above. My crazy brain tells me if you are going to rip out a shower to get to the pipes you might as well design and renovate the entire bathroom. So with that mode of thinking this project began. 

This beauty down below was what greeted us every morning after waking up.... Those gold mirrors seemed to put a spin of elegance on my bed head and sleep wrinkles. The coral made me feel ALIVE... Slight sarcasm noted...

IMG_0728.JPG
before picture master bathroom renovation in phoenixville

All in all the bathroom was functional except for the leaking shower, but I was excited to make the vision in my head come to life. I wanted a sanctuary for bubble baths and relaxation. However, when it comes to renovations we usually fix it up just in time for the next move, and I never get to enjoy. But I enjoy it in my head... 

shower demo

The hard part about a shower leak is often the pipes are not accessible, so you have to do a lot of demo to get to them. This was the case here too. Have I mentioned I love demo and a hammer!! It is a very therapeutic. However, DO NOT TRY THIS AT HOME. Unless you are ready to gut your bathroom of course. That is what ensued during and after the above picture. We tore out the garden tub, shower, and vanity and all the tile everywhere. Let me tell you those little white tiles add up. I think I started hallucinating halfway through and saw those little goblins from Pac-Man in the tiles.... Anyways, if anything it made me move faster! Then we began framing out the walk in shower! I wanted to incorporate a step down wall to keep the space from feeling closed in, and to show case the awesome shower I had in mind. 

walk in shower renovation in Phoenxiville

After the shower was drywalled and we put in a water-proof shower system, I had a plumber run the pipes for the tub and the vanity through the floor. Then I laid my backer board over the subfloor. Then the tiling began. Here at Iron Space Desings, tiling is one of my favorite finishing jobs. It adds so much character to a room wether it is the floor or a backsplash or shower. There is so much to choose from with color and texture. I ended up using porcelain tile that looks like hardwood. I LOVE THIS TILE!! These tiles were 4 feet long which made it easy to lay, and they were beautiful. The funniest part is when people would ask why I laid hardwood in a bathroom (because of the water worry). That is when  a conversation would begin about this awesome tile! After the tiling was finished I was ready to put in the tub and vanity. 

This tub above was a dream to order from Vintage Tub & Bath; however, getting it to the 2nd floor was another story. It weighed a ton!!!  Good thing I work out! I just strapped that thing to my back and carried it up!  Just kidding.... I took me and 3 other buff guys to carry it up the stairs! Was it worth it? 

Pedestal tub renovation in Phoenixville

Here it sits in all its beauty! I hear it calling to me.....Relax! I built this adorable tub tray to hold all my books and tea during baths. Still only in my head. The awesome vintage faucet I also got from Vintage Tub & Bath! 

custom bathroom farmhouse vanity in Phoenixville

David outdid himself with this custom built farmhouse vanity. I found these mirrors at Kimberton Glass in Phoenixville. That place is full of treasure just waiting to be used and refinished for something just like this. The farmhouse style lights I got at Lowes. The sinks were another find from Vintage Tub & Bath. 

walk in shower modern farmhouse bathroom renovation

I added bead board and thick trim all around the bathroom. I found the shutters on the wall also at Kimberton Glass and David turned it into an amazing towel holder with his welding skills. 

custom mason jar light

David also created this mason jar light from a vision in my head. I love the metal accents and the light reflected through the vintage jars. 

modern farmhouse bathroom renovation in Phoenixville
farmhouse sliding barn door cabinet

Here is the toilet room in which I had David make another one of those adorable cabinets (plans by Shanty2Chic). Why not duplicate a great thing!!

modern farmhouse bathroom renovation with walk in shower

Overall, this project came together the way I had hoped. Often in any renovation you run into hurdles which we did. But our team here always puts our brains together to make a space transformation amazing and complete! What do you think?